Tina Parkes – one of the Directors of the British Academy of Floral Art – has an excellent book available called ‘Funeral Flowers — the complete journey’ which is an invaluable reference source for anyone dealing with tribute flowers.

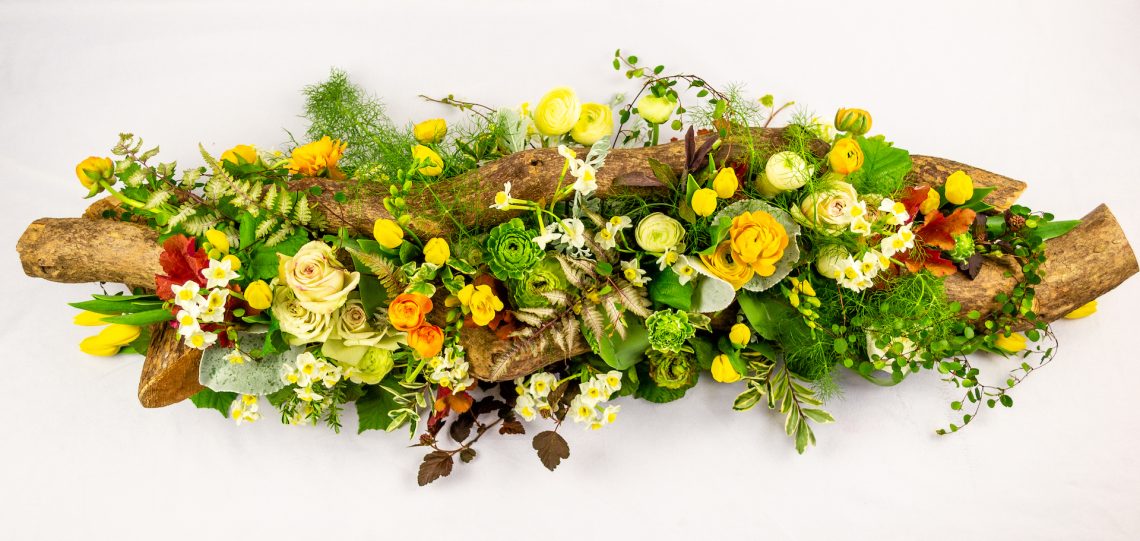
From said book, she shows us here a different spin on the double ended spray with an organic feel giving the client a garden or woodland style.
This design needs to be firm and well-made due to the added weight of the branches, remembering that most funeral directors will pick it up from the structure. Therefore, pay attention to how you secure them to ensure nothing comes apart.
Ingredients
2x large branches
Cable ties
Snub nosed pliers
Pot tape
Double or triple black tray
Biodegradable floral foam
Selection of foliage, including trailing ones
Selection of flowers, including roses, tulips and Ranunculus
Step by Step
- Remove any side shoots on your branches to keep the form simple. Spend a little time laying the branches on top of one another to explore their form and to see how they lock together. Play around until you are happy that you have several points at which the branches meet for attachment and that there is some space between them in the middle for flowers and that they work aesthetically too. Try not to get both branches ending at the same point because this can blunt the design and make it look very heavy. If the branches do end at the same point, you can add some smaller branches later to help you grade out the ends of the spray.
- Firmly secure the branches together using black or dark cable ties (join the cable ties together if you can’t find long enough ones). I used snub nosed pliers to help pull the cable ties really firmly. The aim is to get the branches secure and to ensure there is no movement between them so the structure can be lifted at any point without it moving. You can conceal the cable ties further by covering them in pot tape; this gives added security too.
- Add the floral foam to your tray and placed it under the branch structure. By pressing down the structure onto the foam, you can see the indentation it creates which will make it easier to trim off any excess foam. If required, you can add more floral foam to plug any gaps. Soak the cut foam and then secure with the pot tape; ideally the tape should go completely around the tray and also around the branches to give the most stable, secure base.
- Start adding your foliage and flowers. As the branches are such a key feature in this design, it works well if you can group your materials and place them the way they grow as this will give the design a vegetative, natural look. Materials carefully selected from the same season or same environment will enhance this look/feeling, e.g. a woodland theme requires ferns, mosses, grasses, cones and woodland type flowers.
- Add some key placements of plain foliage to fill some of the gaps and then add your focal flowers, in this case the roses. I have kept an asymmetrical feeling by placing the focal flowers either side rather than in the middle (placing something in the middle of a design can instantly make it feel symmetrical). Remember to work on both sides at the same time to keep the design balanced.
- Next I added the tulips, again in little clusters, and these gave a different form and helped create some lines within the design. Remember that tulip leaves can also be used; usually they are too big to use ‘whole’ but if you cut the stem short and fold the leaf over and then push the stem through the leaf to create a leaf loop, it can perfectly fill any gaps and will add a smooth contrasting surface to the design. Continue adding foliage; by using lots of different shapes, colours and textures it will add character to the design and will stop it from looking too traditional. More variety means a more natural look!
- Now place some colourful spring flowers into the design. I only had a few Ranunculus and therefore needed to make sure I placed them well because of their strong colour and to ensure they did not look lopsided but rather helped focus the viewer’s eye.
- Finish off with some more flowers, bunched together, and add some finer delicate foliage too e.g. ferns, Muehlenbeckia to act as veiling and to help blend the materials together.
- Once happy with the placements, check both sides of the design, fill in any final gaps and then spray liberally with water and store in a cool dark place until needed.
Tina’s book is available in hardback (£25.00) through online retailers and local bookshops.